

 Version
Select which version of the calendar you have
- Desktop Calendar 7
- FAQ
- Walkthrough
- Hotkeys
- Installation
- Desktop Calendar 0.5
- Desktop Calendar 0.4
 Contact
Can't find the answer to your question here? Contact us.
Desktop Calendar 7 Walkthrough
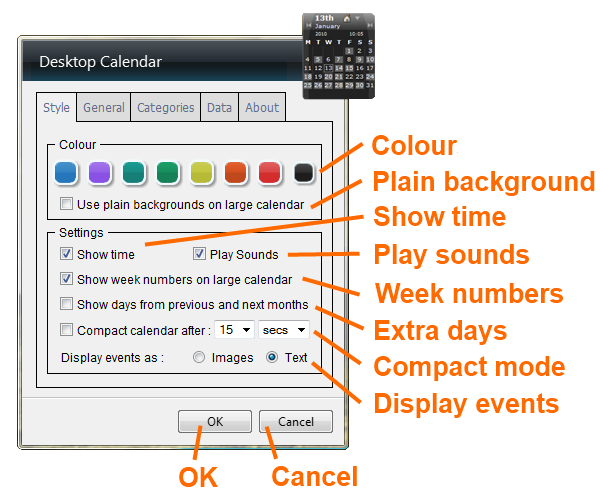
Colour - You can change the overall colour of the calendar here. Click on a square of colour to select it, it will then appear recessed. Click "OK" to apply it.
Plain background - Select this option to remove the pattern from the large calendar background.
Show time - You can turn on\off the time in the calendar by ticking\unticking this check box.
Play sounds - You can turn on\off the sounds in the calendar by ticking\unticking this check box.
Week numbers - Show which week number of the year it is down the left-hand side of the large calendar with this option. To enable it, tick the check box and click "OK".
Extra days - This option utilises any empty spaces at the start or end of the month to show days from the previous and next months. The day numbers are smaller to distinguish them from the current month. To enable, tick this check box and click "OK".
Compact mode - Compact mode reduces the calendar to just the title bar, moving your mouse over it expands it again. Here you can select the calendar to automatically go into compact mode after a specified period of time. To enable it, tick the check box and select your preferred time duration using the two drop-down lists. When done, click "OK" to apply. NOTE: The calendar will not go into compact mode if the settings are open, if the event flyout is open, or if the mouse is being moved over the calendar.
Display events - When in the large calendar view you can choose to display your events by their title (Text) or their category icon (Images). To change it, click on the option you want and click "OK".
OK - Clicking this button will save and apply and changes you've made.
Cancel - Clicking this will dismiss your changes and return you to the calendar.
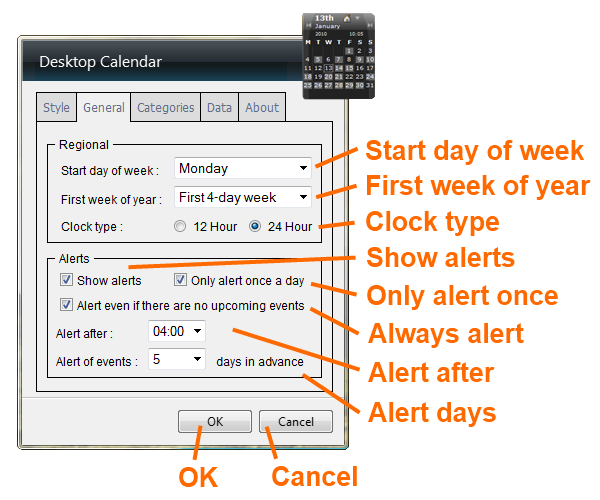
Start day of week - Some people prefer their calendar to start on a different day of the week to others e.g. Sunday instead of Monday. You can select your preferred weekday from the drop down list, then click "OK" to apply the setting.
First week of year - This setting is for week numbers and allows you to select how you define the first week of the year. There are three different methods to choose from:
- Starts on Jan 1st - Week 1 is the week with January 1st in it
- First 4-day week - Week 1 is the first week with 4 or more days in it
- First full week - Week 1 is the first full week of the year
Select the method you normally use and click "OK".
Clock type - Use this to switch between a 12 and 24 hour clock. Click the one you want, then click "OK".
Show alerts - You can turn the alert window on\off by ticking\unticking this check box.
Only alert once - With this enabled, you will only be alerted once per day no matter how many times you turn on your computer. If you would like to be alerted every time, untick the check box and click "OK".
Always alert - If this is switched on, the alert window will be displayed even if there are no upcoming events. Untick the box if you do not want to be alerted when there are no events to notify you about, then click "OK".
Alert me after - You will be alerted of upcoming events when you turn your computer on, or when the date changes. As the date change happens at midnight, you might still be up from the night before and not want to be alerted yet. Using the "Alert me after" option you can set a minimum time before the alert will show e.g. it has to be at least gone 4:00am.
Alert days - Here you can select the number of days in advance to be alerted of events (e.g. how many days are shown on the alert window). Select the number you want from the drop down list, then click "OK".
OK - Clicking this button will save and apply and changes you've made.
Cancel - Clicking this will dismiss your changes and return you to the calendar.