

 Version
Select which version of the calendar you have
- Desktop Calendar 7
- Desktop Calendar 0.5
- Desktop Calendar 0.4
 Contact
Can't find the answer to your question here? Contact us.
Desktop Calendar 0.4 Walkthrough
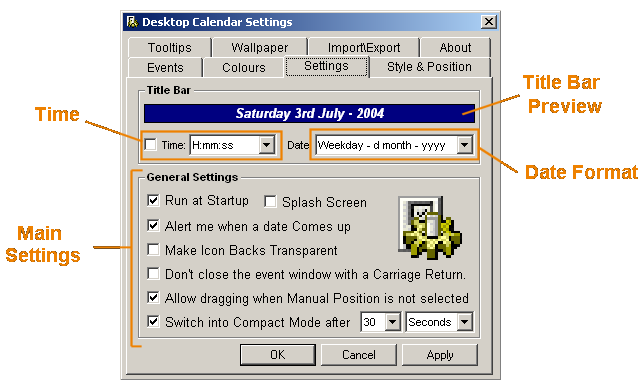
Title Bar Preview - This shows you what your date and time settings will look like.
Time - If you want to display the Time in the title bar then you can tick this box. You can select different formats to display the time in from the drop down list.
Date Format - Like the Time option you can also set the format you want the date displayed in. If none of the preset ones suit your needs then there's the option to 'Use System Format'.
Main Settings - Here's is a brief overview of what the options do...
- Run at Startup - When this option is selected DC will load every time you start your computer.
-
Splash Screen - Use this option to Disable\Enable the splash screen when DC loads...

- Alert me when a date comes up - With this option ticked you will be alerted of any events for the day when the calendar is loaded or the next day rolls over.
-
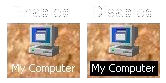
Make Icon Backs Transparent - This option tries to make the back of your desktop icons transparent when running Windows 95, 98, 2000 or NT (Windows XP does it anyway). If you're still unsure what this means take a look at the example below. Note: This may not work on some machines and can sometimes conflict with the Use System Colours option.
- Don't close the event window with a Carriage Return - By default, when entering an event if you press the Enter key (Carriage Return) the program automatically closes the edit box. The idea being that it makes entering events quicker. If you want to add a new line to the event you can either hold down the Shift key and press Enter or turn this option on. Once enabled it will mean that you then have to click on Ok to close the edit box or alternatively use one of the Hotkeys e.g. ALT + O or press Tab then Enter.
- Allow dragging when Manual Positioning is not selected - If this option is not selected then you can only change the calendar position using the Style and Position tab or by selecting manual positioning. If this option is selected then you can drag the calendar around whenever you want. When you release the mouse button you will be asked if you want to change to manual positioning.
- Switch into Compact Mode after XX - Here you can select how long you want the calendar to be idle before it goes into compact mode. Of course you can un-tick this option and always keep the calendar open.
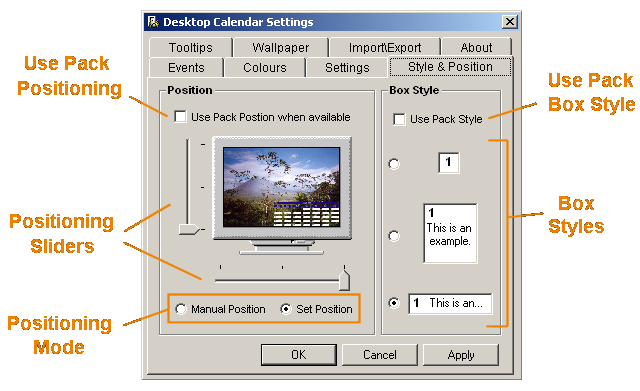
Box Styles - There are three different box styles each with their own advantages and disadvantages. First there is the square box style (middle). This is the largest of all the boxes spreading the events over three lines. Of course as it's the largest box style it also takes up the most room on the desktop. The thin box style (bottom) is smaller and takes up slightly less room then the square box. The disadvantage of this one is you only get one line so you see less of the event. Finally there is the mini box style (top). This is used when you want the calendar to take up a tiny amount of space. The problem with it of course is you can't see any of the events unless you use the tool tips or open the edit window.
Use Pack Box Style - If this option is ticked, and a Wallpaper Pack is selected, then the box style for that specific pack will be used. You can turn this option off at anytime and the box style will return to the one you manually selected.
Positioning Mode - If manual positioning is selected then you are free to drag the calendar around the screen by holding down the left mouse button over the title bar. Once you've dragged it to the right place, release the mouse button. There are some disadvantages to manual positioning. If you have the calendar at the bottom of the screen and change down to a lower resolution, the calendar will be off the screen and won't be visible anymore! To fix this change back to the higher resolution and move the calendar closer to the top left corner of the screen, this should ensure that's it's still visible once you lower the resolution back down again. Alternatively you can use the 'Set Position' option. When you select this, the positioning sliders become active and you can use them to select where on the screen you want the calendar to be. Unlike manual position the calendar will update it's position when the screen changes e.g.. when you lower the resolution or move the start bar.
Positioning Sliders - There are nine possible positions...
- Bottom Right
- Bottom Center
- Bottom Left
- Center Right
- Center Screen
- Center Left
- Top Right
- Top Center
- Top Left
Use Pack Positioning - If this option is ticked and a Wallpaper Pack is selected, then all the other positioning options are ignored. The calendar will get it's position directly from the Pack.